Yes, I’m one of those people now 🤣. Not that this is a new development, I’ve been distro hopping since I was a kid and I’ve used Linux extensively for penetration testing over the last few years, but I have always ended up back on Windows for one reason or another. Recent questionable decisions by Microsoft have prompted me to make a more committed effort to use Linux as my primary operating system.
One of the features I really liked in newer versions of Windows was the Windows Subsystem for Linux (WSL). When I’m doing any kind of research and development work I prefer to use clean virtual machines and avoid cluttering up my host system with dev dependencies and tools. A lot of my work also involves breaking stuff, so my VMs are fairly ephemeral, getting spun up and down all the time. WSL was perfect for this, especially when combined with VS Code for a seamless development experience, so this was a big thing for me to try and replicate on Linux.
Multipass has so far proved to be a decent replacement for WSL and I’m using the VS Code “Remote - SSH” extension to achieve a similar development experience to what I had on Windows.
Another requirement I have is to be able to build and debug Umbraco from source. When I’m doing security research I want to be able to step through the code and pinpoint exactly where issues occur so that I can provide as much detail as possible in bug reports and suggest potential fixes. I was always a user of “big” Visual Studio (as Paul likes to call it!), but that’s not available for Linux, so I’m trialling VS Code instead.
In this post I’ll talk about how to create a Multipass VM suitable for remote development with VS Code and how to prepare it for building and debugging the Umbraco CMS source code.
I’m currently using Pop!_OS which is based on Ubuntu, so this guide should hopefully work for any Ubuntu-based distro. If you don’t want to use a Multipass VM and just want to build Umbraco from source on your host system then you can skip ahead to the Umbraco Setup section.
Contents #
Multipass Setup #
Multipass is distributed as a snap package only, so you will need to have snapd installed on your system. Pop!_OS doesn’t ship with snapd (Ubuntu does), but it can be installed with:
sudo apt update
sudo apt install snapd
It is a bit annoying to have to install snapd just for this, but the only other option seemed to be building Multipass from source and installing it manually. I have things to do so this seemed like the path of least resistance.
After installing snapd you need to log out and back in again. Then you can install Multipass with the snap install command:
sudo snap install multipassMultipass is also available for Windows and MacOS, but I will speak no more about such deplorable operating systems in this post 😂.
Launch an Instance #
To launch a new Multipass instance (VM), enter the following command at a terminal:
multipass launch --cpus 4 --disk 20G --memory 8GThis might take a few minutes the first time you run it because Multipass needs to download the VM image (Ubuntu LTS is the default). You can tweak the specs to suit your needs, but I’ve found these to be comfortable defaults for Umbraco source builds. Without arguments, multipass launch defaults to 1GB of RAM, 5GB of disk, and 1 CPU, which is nowhere near enough.
You should eventually get an output to the console similar to this:
Launched: alert-planarianIn this case alert-planarian is the name of my instance (Multipass picks a random name if you don’t supply one). You can list your instances using multipass list and you can see instance details details using multipass info:
$ multipass list
Name                    State             IPv4             Image
alert-planarian         Running           10.174.223.175   Ubuntu 24.04 LTS
$ multipass info alert-planarian
Name:           alert-planarian
State:          Running
Snapshots:      0
IPv4:           10.174.223.175
Release:        Ubuntu 24.04 LTS
Image hash:     d2377667ea95 (Ubuntu 24.04 LTS)
CPU(s):         4
Load:           0.08 0.07 0.02
Disk usage:     1.7GiB out of 19.3GiB
Memory usage:   437.1MiB out of 7.7GiB
Mounts:         --
Take a look at the Multipass tutorial for a quick introduction to the commands you’ll use the most for managing instances.
Configure SSH #
In order to connect to the instance with VS Code we first need to create an SSH key on our host system. The default location of the public key is usually ~/.ssh/id_rsa.pub. First, check if you already have one:
cat ~/.ssh/id_rsa.pubIf it’s not there, run ssh-keygen to generate a new key pair:
ssh-keygenThen we can add the key to the ~/.ssh/authorized_keys file within the instance as follows (replace alert-planarian with your own instance name):
multipass exec alert-planarian -- bash -c "echo `cat ~/.ssh/id_rsa.pub` >> ~/.ssh/authorized_keys"Now you should be able to SSH into the instance as the default ubuntu user (replace the IP with your own instance IP):
ssh ubuntu@10.174.223.175One thing I like to do so that I don’t need to remember or copy and paste the IP address is to add an entry to my ~/.ssh/config on the host system like this:
Host alert-planarian
  HostName 10.174.223.175
  User ubuntu
This allows me to connect with just the host name (which can be tab-completed!):
ssh alert-planarianConnect with VS Code #
If you don’t have VS Code installed already, head over to the website to download it. Get the .deb version if you are on a Debian or Ubuntu-based system.
To connect to the instance using VS Code you will need to install the “Remote - SSH” extension. Then select Remote-SSH: Connect to Host… from the Command Palette (F1 or Ctrl+Shift+P). If you added the host to your SSH config file then it should appear in the list: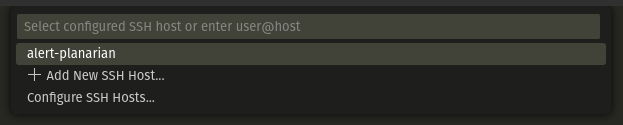
You can also enter the details manually or select Add New SSH Host… to add the host to your SSH config. Have a look at the “Remote Development using SSH” doc for more about remote development with SSH.
Multipass Launch Script #
I didn’t want to have to repeat all of the above every time I wanted a Multipass instance with reasonable specs that I could SSH into, so I’ve created a Bash script to automate it. Check it out on GitHub.
Now we’re sucking diesel.
Umbraco Setup #
The following instructions should work to get the Umbraco 14 source code running on Ubuntu 24.04. I’m not looking at any other Umbraco versions or Linux distros at this time. If you are using Multipass these commands should be executed within your VM.
Install the .NET SDK #
The .NET SDK is available on the official Ubuntu 24.04 package respositories, so installation is trivial using APT:
sudo apt-get update
sudo apt-get install -y dotnet-sdk-8.0
For other .NET versions and Linux distros see the “Install .NET on Linux” docs.
Use the following command to verify that you have the correct of the SDK installed (at least .NET 8):
dotnet --list-sdksInstall Node.js #
Node.js is best installed via Node Version Manager in case you need to run multiple versions of Node.js side by side. Install it with:
curl -o- https://raw.githubusercontent.com/nvm-sh/nvm/v0.39.7/install.sh | bashEither exit and restart your shell or run the following command to bring the nvm function into the current shell session:
source ~/.nvm/nvm.shThen we can install Node.js (20 is the LTS version as I am writing this):
nvm install 20Verify that the installation was successful and you have the correct version installed (at least Node.js 20):
node -v
npm -v
Refer to the Umbraco Requirements doc for information like minimum .NET and Node.js versions.
Get the Source Code #
Next we need to clone the Umbraco source code using Git. If you are planning to contribute and make a pull request, you should first create your own fork of Umbraco-CMS on GitHub. Right now I am just wanting to review and debug the code, so I will clone the main repo:
git clone https://github.com/umbraco/Umbraco-CMS.gitThe new Umbraco Backoffice (Bellissima) is a standalone project contained in a separate Git repo, Umbraco.CMS.Backoffice, and is included as a submodule in the main repo. Retrieve it as follows:
cd Umbraco-CMS/
git submodule update --init
Build and Run #
From inside the repo directory, run the following command to build the entire solution:
dotnet build umbraco.slnThis will build both the front and back end projects and will take a very long time. So go and grab a coffee. Make a whole pot in fact. ☕
Okay, hopefully that completed without errors. Now you should be able to run the Umbraco.Web.UI project:
dotnet run --project src/Umbraco.Web.UI/Umbraco.Web.UI.csprojIf you are using Multipass you will need to tell ASP.NET to listen on the IP of your instance so that you can access it from your host (you can also specify a different port if you wish):
dotnet run --project src/Umbraco.Web.UI/Umbraco.Web.UI.csproj --urls=https://10.174.223.175:5000Alternatively, if you run the project from the VS Code integrated terminal it will automatically forward the port on your host to the port within the instance.
The console will eventually output a message similar to this:
[13:33:37 INF] Now listening on: https://10.174.223.175:5000Open your web browser, navigate to the URL provided, and follow the instructions to install Umbraco!
Debug with VS Code #
For the best C# editing and debugging experience within VS Code you will want to install the C# Dev Kit extension. If you plan to work with the front end code then you will also want lit-plugin, but I’m only concerned with the C# side of things in this post.
When you open the directory containing the umbraco.sln file in VS Code the C# Dev Kit extension will activate and add a new view in the Primary Sidebar, the Solution Explorer. This is similar to the Solution Explorer you may be familiar with in big Visual Studio.
To check that debugging works, right-click the Umbraco.Web.UI project and in the Debug context menu select Step into New Instance: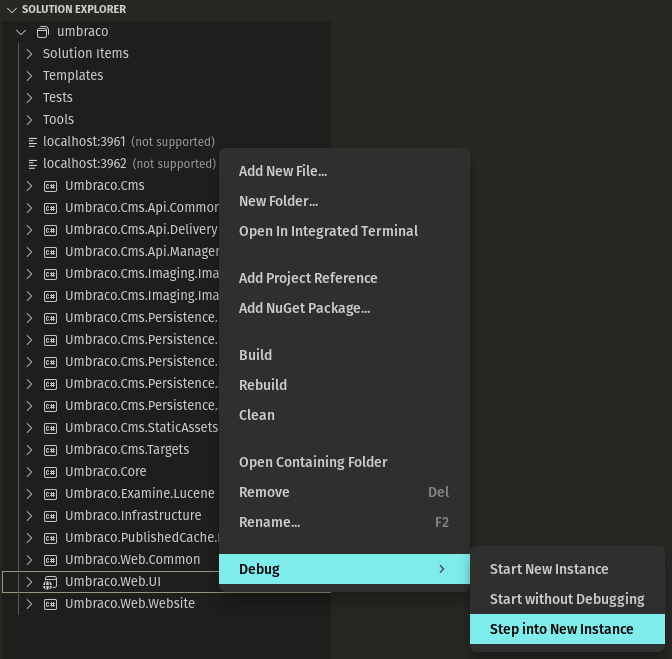
All being well, the project should start with a debugger attached and be stopped at the entry point of the code:
See the VS Code docs for more information about C# debugging.
Increase File Watcher Limit #
One issue you might run into when loading the solution into VS Code is this: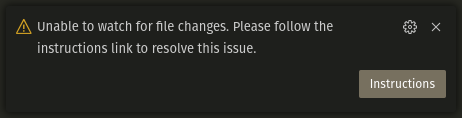
This indicates that the VS Code file watcher is running out of file handles which are needed to detect when files are changed and ensure that things like IntelliSense continue to work. This occurs because the Umbraco solution is very big and contains a lot of files.
To fix this, you need to increase the limit on your system as follows (if using Multipass, this should be executed within the VM):
echo 'fs.inotify.max_user_watches=524288' | sudo tee -a /etc/sysctl.conf
sudo sysctl -p
I’ve also added the above commands to my Multipass Launch Script, just in case I run into the same issue with other projects.
For more information about this issue see “Visual Studio Code is unable to watch for file changes in this large workspace” (error ENOSPC).
CMSup #
Once again, there are a few steps here that I don’t want to have to perform manually every time I want to start working with the Umbraco source code. So I’ve created yet another Bash script to automate it, CMSup (name inspired by GHCup, but nowhere near as worthy).
As well as executing all of the above steps, it also supports checking out a given branch or tag (as sometimes I want to investigate issues in specific Umbraco versions), adds the default starter kit, and performs an unattended install!
Assemble 🧩 #
Armed with these two scripts my process now looks like this:
- Use the Multipass Launch Script to spin up a VM.
- Connect to the VM using VS Code.
- Run the CMSup one-liner from GitHub.
- Go make a beverage and hope the script doesn’t break.
- Come back to a fully functioning, debuggable CMS and demo site.
- ???
- Profit?!
Right, this yak has been well and truly shaved, now maybe I can actually start bug hunting…
That’s all folks!
Use Linux 🐧.